Tuesday, March 30, 2010

Tomatoes: Sprouts

It's spring time here in Tokyo, but you wouldn't know it if you stepped outside. We've had a week-long cold snap here which has really put a damper on cherry blossom viewing. Usually the cherry trees are in full bloom, but due to the cold many are buds haven't opened yet.

Today is a bit warmer, but it still doesn't quite feel like spring has sprung.

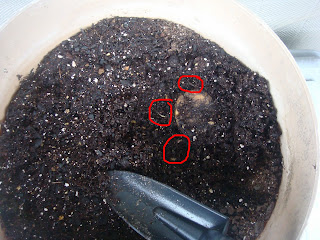
The tomatoes I planted in the first week of March are sprouting. The cold hasn't affected them as much as I had expected, and all 16 pots have tiny little sprouts poking up through the soil.

As I mentioned before, each pot is planted with 3 seeds in the expectation that the majority of seeds will likely fail to germinate. That 16 sprouts have appeared is pretty astonishing to me, since I wasn't expecting so many to actually make it.

These plants will continue to grow in the pot until they are about 20cm or so. My notes show that the plants should be ready for transplant in late May.

Saturday, March 27, 2010

Strawberries: First fruits of the season

This spring hasn't quite begun, it seems. The past couple days have been in the low teens (°C) and the forecast is rain and cold until mid-week. Although very cool, it hasn't dropped below freezing, so the plants in the veranda garden are pushing through.

It's been almost a week since I last blogged and there has been quite a bit of growth all around. The potatoes are growing like crazy, the broccoli is gaining height and new leaves are coming in, and most exciting is the tomato sprouts that have broken through the soil. I'll save those for another day when pictures are better.

Strawberries are looking great. There are lots of flowers this year, a stark contrast to last year when there were only a handful of flowers all season. I can't wait for fruiting season!

Speaking of fruiting...
Hid underneath a big leaf was a little strawberry just getting started! In this picture, the fruit is about 1cm from stem to tip. I've never measured how long it takes for my strawberries to ripen, but I'll definitely do it this time.

On another note, yesterday I bought some strawberry-specific fertilizer at the home center, but when I looked for it this morning it was nowhere to be found. I went back to the store to see if I might have left it at the register, but no one had turned it in to the lost & found. I'm bummed.

Monday, March 22, 2010

Watermelon: Weekend planting and seed preservation tips

Someone mentioned to me over the weekend that no one is interested in pictures of my garden. It's like pictures of peoples' cats. This person suggested that I add some educational information about gardening and the plants I'm growing so that people have a reason to keep coming back.

I gotta say, I tried that with the avocado blog, but people never really did come back. They never really came in the first place, so that might be a reason.

A couple weeks ago I planted tomatoes. I wrote about how I had preserved the seeds from last year for planting this year. I actually did the same thing for a particularly tasty watermelon, so instead of showing the final result, I'd like to share the whole process.

There are essentially two kinds of seeds, Wet and Dry. The difference being that wet seeds have juice or other organic matter attached to them, while dry seeds come out of the seed pod dry.

Dry seeds are typically found in flowers, nuts, grains, and herbs. When they are picked, they can simply be put into a paper envelope and preserved until the next planting season. I usually just fold some normal office-use paper into a small packet and use staples to seal it.

Wet seeds can be found in most fruits and vegetables. They need to be dried off before preservation. Mold and rot are major risks if the seed is not completely dry. In the wild, these plants would fall to the ground or get eaten by animals, but here on the veranda they will get put into pots. I don't want them sprouting early, so I devised a simple way to dry them out and preserve them at the same time.

Below is the final result. I'll be working backwards since the seeds are already preserved, but you can reverse these steps to figure out how I originally saved the seeds.

This is the packet of watermelon seeds. I used a sheet of tissue paper to hold the seeds. Tissue paper absorbs water and is biodegradable. Since it is likely that the seeds will stick to the paper after drying, it is important that the storage medium be able to go into the ground with the seeds.
That is Scotch tape holding the paper in a tight roll.

Unrolling the paper, you can see the seeds held in a fold in the middle of the tissue. I use an extra fold to add some strength to the paper and give the seeds an extra layer of protection. On the right, the paper is completely unfolded. You can see that some of the seeds have some whitish marks. This is tissue paper that has adhered to the seed. No big deal.


To start the seeds, I picked up a ten-pack of these starting trays at the home center. I think it cost about 200 yen for 10. Pretty expensive, and I think I could have gotten a better price if I shopped around, but I don't have a lot of seeds to start and I don't need 100 trays. This is the easiest choice for me.


Only 10 seeds were saved last year, so I only filled 10 pots. Not every seed is expected to sprout, but since the number of seeds is so low, I decided to give each seed its own pot. Also, with the strong winds we've been having lately the more weight, the better.

Just fill each pot with soil and poke a hole in with your finger. Piece of cake!

After planting each seed, the whole kit gets a good dousing of water. Like the tomatoes, I'll give these guys a good watering once a week.


One thing to think about is how much water the plants are getting. Too much means that the seeds will get waterlogged and the sprouts may drown. Too little will dry them out completely. It's tough to get a good balance since we are not using a greenhouse, but giving them a thorough watering once a week ought to be just right this season.

Friday, March 19, 2010

Broccoli: Strong winds snap leaves in half

The other day I mentioned we had some strong winds that blew the plants all over. The vegetable that took the brunt of the wind was the broccoli. One of the larger leaves snapped right in half.

Luckily, most of the plant is still in good shape.

Maybe it's just me, but the plant looks bigger and bushier than last week.

Harvest is still a couple months away for this plant. Last weekend in Kamakura I saw an ornamental broccoli growing outside someone's house. It is actually a pretty nice looking plant, and much taller than I had expected. I wonder if this pot will be large enough...

Thursday, March 18, 2010

Potatoes: Sprouts, shoots, and leaves

In just a week and half, the potatoes have really started to take off. In the picture below, you can see the two potatoes sending up shoots.

The potato on the top is the one that I circled last week. It is much closer to the soil surface so it is the first to break through with visible leaves. The other one is still under the soil, so only a couple leaves are visible.

Each potato will produce several plants, so even though the bushiness seems like a good sign, I will need to prune them both back to one main plant. This allows for each potato to maximize the soil nutrient usage as well as total soil volume for itself.

I'll let these grow a bit more, maybe a week or two, before pruning. I want to select the best sprouts.

Tuesday, March 16, 2010

Bell peppers: Alive or dead?

Last year I bought two bell pepper plants. A cheap green one from a farmer's market and an expensive red one from Del Monte at the home center. Only one green pepper was harvested last year. No red ones ever developed.

That was last year. This year, I'm hoping that they made it through the winter and will produce some fruit. However I'm not pinning my hopes too high since last year I was disappointed.

Starting from seed, the sprouting season is right now until the beginning of April. After that, the seedlings should go into the ground and the fruiting season lasts from late June through the end of October here in Tokyo.

Since I have plants still growing since last year, I expect that I will have a small headstart on production, but it all depends on the condition of the plants.

This is the green pepper. It has leaves and flower buds, but I'm not sure how healthy it actually is. It hasn't changed much since last November.

It was a bit bigger before winter, but I cut it back significantly since most of the growth was wild and uncontrolled. You can see the flower buds poking out here and there. These were also present before winter closed in.

This is the red pepper. It is in much worse shape than the green pepper. It lost all its leaves before winter and I had to prune it back quite a bit due to dying branches. If this is still alive, I'd actually be very surprised.

If I don't see any leaves develop by the middle of April, I'll probably uproot this one and plant something else.

Saturday, March 13, 2010

Strawberries: The small green house

Strawberries are an incredibly hardy plant, and year after year they can fruit. Three years ago I bought a small strawberry plant on a whim and had several garden strawberries that season. Store-bought strawberries are picked early, so the fruit's sweetness and flavor is not fully developed. The difference between store-bought and ripe-picked is like night and day.

Another great thing about strawberries is that they can produce fruit a couple times a year. Typically strawberries will produce fruit in the warm summer months. However, if you can keep the temperatures right, a winter crop is also possible. In fact, this past February I was able to pick a winter strawberry. (only one, sadly)

To keep the strawberries warm in the winter, I bought a plastic greenhouse for them. The strawberries sit atop the air conditioner and the greenhouse fits right over the planter and A/C unit as you can see in the following picture.

Yesterday we had very strong winds which ended up breaking some leaves on the broccoli, but the strawberries were just fine inside the greenhouse.

I didn't expect it so soon, but the strawberries are flowering! Each flower can become a fruit with care. For such a delicious fruit, strawberry flowers are very plain.

The yellow area in the middle, if properly pollinated, will grow into the strawberry fruit. The small yellow parts sticking out are full of pollen and are waiting for some nice bee to spread the pollen around. Unfortunately we don't have bees here, so I use a soft makeup brush ("borrowed" from my wife) to manually pollinate each mature flower.

My experience with these strawberries has been that they are not very prolific and the fruits are quite small. I think this may be related to soil quality, so this season I'll be keeping a close eye on this particular aspect.

Thursday, March 11, 2010

Broccoli: Just 100 yen!

Supermarkets are overflowing with broccoli at the moment, but the actual "natural" growing season for broccoli is during the summer months. The heads of broccoli sold now are either from storage or grown in hothouses. Not that there is anything wrong with that, but sometimes the taste of the vegetable isn't the best.

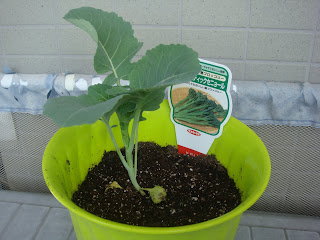
It's interesting that broccoli is hitting the stores now because now is actually the sprouting season for it. This past weekend I visited the home center to pick up some pots for my tomato seeds and found broccoli seedlings for 100 yen apiece.

I'm learning as I go with broccoli, but there seem to be two main types sold in Japan. The first is the large head broccoli which is the most typical type found in stores. The other is called stick broccoli which instead of accumulating into one large head spreads out into individual stems. In the U.S. I've seen this sold as Chinese broccoli or Gai Lan.

Stick broccoli can be harvested continually as the stems reach the right size. This makes it all the more cost effective. Interested, I picked up one seedling and transferred it to a larger pot.

According to the instructions on the back of the label, moderate watering and lots of sunlight are all that is needed. Hopefully by June I'll have some delicious broccoli!

Tuesday, March 9, 2010

Potatoes: First look

When it comes to potatoes, there really isn't much to growing them. All you need is the a potato, some soil, and a planter big enough to accommodate it.

Potatoes should be planted in mid-February to early March. I planted my potatoes about 3 weeks ago. Then there was an accident and one of the planted potatoes was removed from the planter. Caution: Do not let curious children play around planters.

Potatoes are pretty fast growers. According to my notes, the time from planting to harvesting is on the order of 90 days. They require very little care, and grow easily in soils that would not be suitable for other plants.

At the home center, they sell bags of "seed potatoes". These are specially selected spuds that are superior growers. I have no idea how they determine this. From the looks of it, they are mostly misshapen or small potatoes that wouldn't make the cut in the grocery store. While cheap, I don't really need a whole bag of seed potatoes. I just need one.

My wife told me not to use her potatoes for planting because it was a waste, so naturally I kept it a secret when I snuck one kita-akari potato for planting. To prepare the potato for planting, I just cut the potato in half. There are other things one can do to promote growth like applying rooting powder, but I don't have that on hand and I don't grow so many things from cuttings, so it would just be a waste to buy it specially for potatoes.

Potatoes need about 30cm between each plant. My planter isn't quite big enough to hold two potato plants at that distance, so I've crowded them with only 20cm of distance. I'll probably pay the price for this later.

To plant, just put some rocks in the bottom of the pot to aid drainage, and add about 40cm of soil. Place the potato pieces (halves in my case, but you could cut a large potato into quarters as well) open face down at the proper 30cm spacing and cover with 5-10cm of soil. Water thoroughly and leave it alone.

Here is a picture of the current state of the potato that was dug out of the soil. I've circled the visible roots.

Note that the potato is facing upwards. This is because it was replanted incorrectly. However despite this, the potato is hardy and able to continue growing.

Monday, March 8, 2010

Tomatoes: Planting seeds

Everyone thinks of tomatoes as a summer fruit, and as far as the actual fruiting goes, that is correct. However, tomatoes begin their life in early March.

The planting window for tomato seeds in Tokyo is the last week of February through the first couple weeks of March. We've been having variable weather, ranging from warm and sunny to snow. I put off planting until this past weekend to avoid the chance of frost killing the seedlings.

I bought a pack of small starting trays at the gardening supply shop and started 16 pots. Each pot has 3 seeds to maximize the possibility of sprouting. If more than one seed per pot sprouts, I'll have to perform some thinning.

To prepare the seeds, I simply ate a greenhouse tomato in January. I gathered up all the seeds that spilled out and placed them on a tissue. I folded the tissue over and rolled it up into a tube and sealed it with some scotch tape. The tissue soaks up the water from around the seeds and keeps them dry.

Before planting, I simply unrolled the tissue and cut the paper so that each seed was separate on its own piece of tissue. The seeds stick to the tissue, so I don't make any attempt to separate the seeds from the tissue. Rather, I just cut the paper into small slivers. These slivers go directly into the soil. For the past few years I've done this with different types of seeds to great success, so it might be worth a try if you are growing anything from seeds that you're collecting yourself.

Here is a picture of the starting tray with the seeds planted:

According to my notes, the seedlings will take until May to grow large enough to be transplanted. Watering will follow a weekly schedule. Keep the soil moist but not overly wet, allow for full drainage.

Next tomato update will probably be when the sprouts appear above the soil.

Sunday, March 7, 2010

Welcome to Veranda Gardening!

Due to unforeseen (maybe a little foreseen) circumstances last December, I suddenly had a lot of free time to explore my own hobbies and search for a new job. What I found was that I really enjoyed gardening, especially vegetable gardening. I live in a suburb of Tokyo, so my gardening is mostly limited to the space available on my veranda. That's what this blog is about.

I have some other blogs regarding my life here in Japan and one dedicated to my avocado trees. Please have a look if you have time.

With spring right around the corner, the planting season has begun. Since space is at a premium and my wife doesn't appreciate me buying planters every weekend, I have come up with the following plan for this year's vegetable crop.
In addition, I anticipate growing some morning glories and continue with the avocado trees. However the main focus of my veranda garden will be vegetables.

I hope you enjoy the blog!